
This page contains affiliate links, which means I may receive a commission if you purchase through links on my site, at no additional cost to you. Find out more here: affiliate disclosure.
As well as producing and performing your music, Ableton Live is also great for DJing. It’s become the DJ software of choice for many professional DJs because it offers great control, versatile setups, and loads of creative expression.
If you’re using Ableton for your first DJ mix, it might be a little unclear how to set up Ableton for DJing. I DJ and do live performances using Ableton, so I thought it’d be helpful to make a basic guide and show you what I do so you can start DJing with Ableton.
I’ll show you how to set up Ableton, warp your tracks, and do your first mix. This guide will be a good starting point to learn the basics, which you can build upon later. The great thing about using Ableton Live for DJing is that the level of complexity your DJ setup takes is up to you.
This guide will cover the following:
Intro to DJing in Ableton Live
Since Ableton Live first hit the market in 2001, it’s become a highly versatile and powerful piece of music production and performance software. I absolutely love it!
Ableton’s flexibility allows us to perform a traditional DJ of mixing other people’s music or create a hybrid set where you DJ and perform your own music. You have the ability to build upon your setup and add effects, loops, samples, drum machines, and synths into your performance as you become more advanced.
This guide will show you the basics of how to DJ in Ableton, which you can then build upon.
Related: Best DJ Courses Online
What do I need to DJ in Ableton?
The beauty of DJing in Ableton is that you don’t need a lot to get started. Ableton Live was designed as a live performance tool, and though having an external controller in your setup can make the performance process much more fluid, it’s not strictly necessary.
If you’re looking for a controller, check out this article on the best controllers for Ableton. I use the Akai APC 40 MK II as it works for DJing and performing my own tracks.
Here are the things you should have to get started:
- Ableton Live Software – Of course, one of the first things you’ll need to get is a copy of Ableton Live.
- Laptop or Desktop – Make sure that you have a good laptop for Ableton that has a decent processing system that meets Ableton’s requirements.
- Audio Device – You will need to be able to hear what Ableton is playing. You’ll need an audio device for Ableton to send audio from your computer to your speakers.
- Listening Device – Getting a pair of studio headphones, monitors, or both is up to you, but having something decent to listen to other than laptop speakers is crucial. Although you can monitor on headphones, having speakers is much better.
- External Controller – There are loads of DJ controllers and Ableton controllers that can be integrated into your setup. Getting yourself a controller is highly recommended. You can just about mix without one, but it won’t be easy.
- (Recommended) External Hard Drive – While you can store and work on projects directly on your computer, most DAW developers recommend having an external hard drive for storing your wav files.
- Music! – You’re going to need some tunes to play.So get the tracks together that you want to mix. These should be in .wav or .mp3 format. Try Beatport if you’re struggling to find some music.
Audio Setup
Before diving into the warping and mixing tracks, we have to set up our audio first so we can hear the tracks in our session.
Ask a few DJs; I guarantee they’ll all have a slightly different DJ setup. To offer a guide on all the setups would be a massive task – so, I’ve broken this guide down into two main concepts. DJ’s that mix in Ableton and DJs that mix outside of Ableton using a hardware mixer.
The two setups are slightly different in terms of routing audio.
DJ’s that mix in Ableton
This setup means that you are mixing your tracks within Ableton using a MIDI controller. The audio leaves Ableton straight to your audio device, already mixed. Once the audio hits your audio device, it goes straight to your speakers. The picture below shows how this DJ setup might look (Fig.1).

DJs using a hardware mixer
There are a number of DJ controllers and mixers that can be used with this approach, each with differing connectivity options. The main idea is that you route the music from Ableton to mix your tracks externally using a DJ mixer. This means your audio comes out of Ableton un-mixed. To do this, your equipment will need to be able to take the audio from Ableton and allocate it to separate channels on your mixer. Then, send the audio to the speakers. You can do this by selecting an audio card with multiple audio outputs.
The picture below shows how this DJ setup might look (Fig.2).

Warping your Tracks
DJ 101
Before we get into warping, it helps to understand why we do it. To do that, here’s a quick overview of DJing before we start…
As a DJ, you want to create smooth, seamless mixes by blending one track into another. To mix one record into another, you must match their tempo or beats per minute (BPMs) so that they ‘sync’ together and are ‘in time’. Matching two BPMs together is a technique known as beatmatching.
Before digital technology, DJs would beat-match with turntables either by slowing or speeding up the record. The slower the record, the slower the BPM, the faster the record, the faster the BPM. Matching a record’s BPM on turntables is done by ear and isa tricky skill to learn. Good news for those who don’t want to learn that skill… CDJs & software can detect the BPM and sync tracks for us.
In Ableton, we do this with a function called warping. Warping allows us to change the BPM of a track without causing any changes to its pitch. We apply the warping to our tracks in advance so that they lock to a tempo and are ready to mix.
Ableton defines warping as: “changing the speed of sample playback independently from the pitch”
Warp Speed
OK, so let’s prepare our music by warping it.
You’re going to need some music.
Pick a few tracks you like that are of a similar BPM and genre. If you’re into electronic music, a good place to find music is on Beatport. It’s the go-to marketplace for DJs and holds the largest selection of downloadable dance music on the web. It’s well worth checking out.
We are going to add warp markers to our track’s audio. Warp makers will be added where we locate our track’s beats – this will then allow us to lock the tempo of our track.
If you want to read more about warping, check out the Ableton manual’s Audio Clips, Tempo and Warping.
Related: The Best Ableton Courses Online
Compile Your Tracks – Once you have all the tracks you want to use in your mix, put them into a folder on your computer (or external hard drive) so that they are easily accessible via Ableton. I use a folder on my drive called “Beatport.”
Locate the Folder in Ableton – Within Ableton’s navigation bar, under “Places” locate the folder containing your tracks. I permanently added the folder with my DJ music to the Places tab for easy access. You can do this by clicking “Add Folder” and selecting your tracks folder. In the picture, you can see I’ve already added my “Beatport” folder, which is located on my Macbook’s drive.

Create an Audio Channel – As standard, Ableton will open as default with two Audio Channels. If it hasn’t, you can press Ctrl+T to create a new audio track.
Drag Your Tracks into the Audio Channels – You can drag your audio files from your music folder into the audio channel from the navigation bar.
Bring Up the Waveform – To bring up the waveform of the first track in the display window, you can double-click on the track name in the clip or select the ‘clip view selector’ tab in the bottom right. Your session’s master BPM should be 120 bpm, which is the default.
Activate the Warp button – depending on how you have Ableton set up, you may find this is already activated for your sample. There are different warping algorithms – I suggest using Complex Pro for complete tracks rather than the ‘beats’ setting. Have a listen and see which you prefer.

Ableton will already have attempted to warp your track for you – it normally does this very accurately. You can check that the warping is done by playing your track and ensuring it is in sync with the metronome. If you find any errors, follow the steps below.
You will also notice a track isn’t warped correctly if its timing drifts whilst you are mixing. There may be some slight timing issues depending on the genre you’re mixing and if the beats aren’t exact (e.g a live drummer). Sometimes, Ableton gets warping completely wrong. If that happens, follow the next steps to warp your track manually.
Find the First Warp Marker
Let’s check our warp markers are set, and our music stays in time.
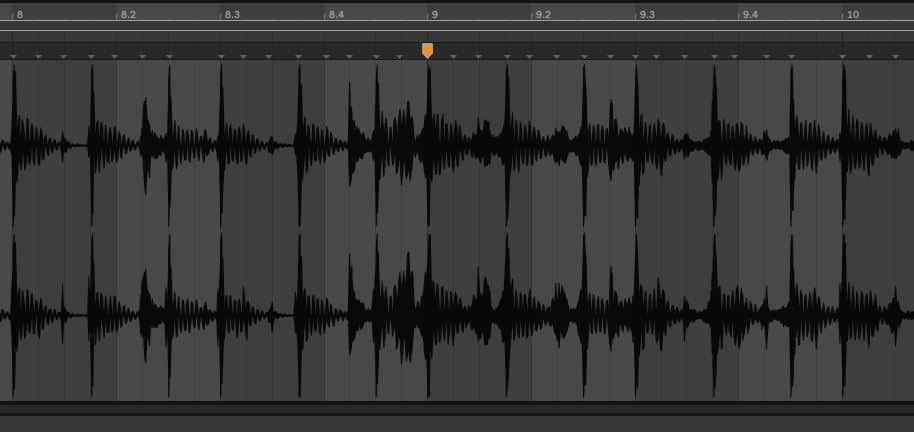
Zoom in to find the warp marker on your track (your warp markers are small yellow tabs). We want the first warp marker to be on the first beat of our track and to line up with the first beat on the ‘Clip Display’.

To zoom in, I hover my cursor over the ‘clip display’ so that a small magnifying glass icon pops up. I then hold down my mouse button and move my mouse to zoom in. You can also do this with the + & – keys.
The first warp marker will be at the start of your track and sets where the warping will begin. Most tracks will start warping from the beginning, however if there is an intro section without beats it may be easier to set the warping to start on the first beat of your track.
Note – If Ableton has incorrectly warped your track, you may notice lots of yellow warp markers. You can remove these by navigating to the audio editor and using the “select all” function on your computer (CRTL + A on PC or CMD + A on Mac), then hitting delete.
Adjust the Warp Markers – Locate the 5th beat of your track and double-click to create a new warp marker. After that, right-click on the second marker to open the drop-down menu and click “Warp From Here (Straight).”

Sync It Up – Press the small square at the top left of your display to enable the metronome. Then, press the play button on your individual tracks to make sure they match up. You may notice that your track drifts out of time with the metronome – this means you will have to adjust more warp markers manually in the track.

You can see in the example provided that the beats are out of sync with the grid. Adding a new warp locks the track back in time. With a little trial and error, you will learn to hear (and spot) when a beat is out of sync. Once located, you can add a new warp marker to fix the timing.
Save Session
Make sure to save your work to recall the session with the warp markers the next time you want to use it. One of the best ways to do this with a DJ mix is to select “Collect All And Save” from the file menu. Doing so will merge the audio files into your project so that everything saves as a single file.
Once we’ve warped our tracks, we can set up our DJ session template. This will allow us to mix between the tracks we just prepared.
Related: How to Get DJ Gigs
How to Make a DJ Set in Ableton – Setting Up A Session
As I mentioned earlier, DJing requires you to seamlessly blend one track into another, known as ‘mixing’. We will need two audio channels to mix two tracks in Ableton Live. Let’s re-create a basic DJ mixer in Ableton Live that has EQ, volume control, and a crossfader.
You can do the following in a new project – or use the same project that you warped your tracks in.
When you open up an Ableton Live session, the default setting gives you two audio and MIDI channels. We don’t need the MIDI channels to mix music, so delete them.

We will use the “EQ Three” Ableton device to emulate a DJ mixer’s EQ strip. Add one to each Audio channel.
If you have a MIDI controller, map the volume of each channel to a fader on your controller. You do that by using the “Map” function in Ableton (Crtl + M on PC, CMD +M on Mac). Then map the Low, Mid, and Hi EQ dials to 3 separate knobs on your MIDI controller.

To set up a crossfader for your MIDI controller, navigate to the master bus and enable the crossfader tab.

Now you will see under each channel there are options A & B. This allocates the channel to a side of the crossfader. A is Left, B is right.
Keep Channel One as A and select B for Channel 2.

Now we need to map the crossfader on your MIDI controller to the crossfader in Ableton. Head to the Crossfader under the Master Bus, and select it. Hit “Ctrl + M” on PC to open up the mapping and map to your crossfader.

Turn off mapping and save your Ableton project. You now have a DJ template for Ableton Live.
How to organize and mix your tracks
Once you have your tracks warped and your DJ session set up, the next part is figuring out how to mix your tracks live. The art of mixing is a beautiful skill to learn, this guide shows you a very basic technique to get you started :).
If you’re looking to improve your mixing & DJ skills have a look at these courses and these books.
Let’s break it down a basic mix into a few simple steps:
- Open Your Session – If you properly saved your Ableton Live DJ set, you should be able to open it up with everything properly warped. It’s a good idea to name and color code your tracks, as it’ll make them more identifiable during your live performance. How you colour code your tracks is up to you – you try having specific colours for either BPM, KEY, Intensity or Genre.
- Organize Your Tracks – Add the tracks to your channel in the order that you want to play them live. I like to imagine the “1” and “2” audio channels as turntables (a left one and a right one). In the top slot of your first audio channel, you can place the first track, while the top slot of your second audio channel should hold your second track. The third will go in the second slot of the first audio channel, and so on.
- Play Your First Track – Click the small play button on your first track. Make sure that the second audio channel’s volume is turned all the way down, or the crossfader set to one position so you don’t hear it until you’re ready.
- Play Your Second Track – The time indicator above the volume slider will tell you how much time is left in the first track. Once it starts reaching the end, around 1:30 mins left, begin raising the volume on the second audio channel and lowering the volume on the first track playing to gradually fade it out. Repeat the steps to play the third track, fourth track, and so on.
- Using EQ – Once you have mixed a few track using volume fades you can now incorporate mixing using the EQ knobs. Having volume control over set frequencies helps you blend tracks together much more smoothly. You can remove the bass from one track whilst fading in the bass on another. This is a useful trick to avoid the bass drums clashing.
How to Record a DJ mix in Ableton Live
Now that you’re making some banging DJ mixes you’ll wanna share it with your mates /the world! We can do this by making sure we record your DJ set in Ableton.
As there are a number of different DJ setups for Ableton I’ve broken this into two basic approaches. Mixing within Ableton and mixing outside of Ableton.
Setup – Mixing within Ableton
- Set Up – Make sure your setup is properly configured as shown above.
- Press record – When you start to mix, hit the record button. This will record your mix, including all the MIDI automation into the Arrangement window. Simple.
- Edit – Prior to exporting your mix audio you can edit the mix if you want.
- Export – Once you have finished your mix you can export the audio as a wav. Select your mix and click File >> Export Audio & Video. Make sure the export length covers the duration of your mix, then export.
Setup – Mixing Outside of Ableton
- Change the Input – In Ableton Live, go to ‘Preferences’ > ‘Audio’ > ‘Input Config’ and select your audio interface from the drop-down menu. Next, click the ‘Track’ button and choose the input you want to record with.
- Record – Once you’ve created a new track, choose which input device you want to monitor with. Next, press the record button on your mixer and the ‘Record Arm’ button on your new track. You’re ready to start recording.
Having recordings and uploads to SoundCloud / Mixcloud are really useful when you reach out to a promoter to book a shows. Check this article if you’re looking to get DJ gigs.
That concludes the basics of how to DJ in Ableton. If you want to add more complexity to your sets, you can start adding to this project.
I will write additional information on hyrbid sets soon. Meanwhile, if you’re still wanting to improve your Ableton DJ skills, you could consider checking out these Ableton Courses & DJ Courses.
FAQ
Is Ableton Good for DJing?
Ableton Live is one of the best software options on the market for DJs, as it is a highly flexible DAW that allows for amazing live set customisation and the ability to perform hybrid DJ sets. In my opinion, the overall composition and arrangement process is far more intuitive than any other DAW out there, allowing you to mix tracks, samples and synths with ease. Ableton’s also filled with powerful features such as being able to set up your own effect chains and ensure everything is in time using the Ableton warping function. The warping function is truly ground breaking as it has meant that DJs no longer have to learn how to beat match – allowing them to focus on other creative ideas a different elements in their live set. Plus, Ableton Live pairs beautifully with other types of hardware and software, such as Traktor or Serato, making it a versatile tool for all types of DJs and producers.
Can you DJ with Ableton Live?
Yes. Ableton Live is a good option for anyone looking to make a DJ mix. Beyond the fact that the software has one of the best beat-mapping or warping functions out there, you can also hook up a wide range of external hardware to expand your setup, from synthesizers to pad controllers and beyond.
Check out my articles on Ableton Controllers to see some of the most popular equipment for controlling your DJ sets. However, even if you don’t have any external hardware, you can still use Ableton to make your own tracks or studio DJ mix.
Related DJ Articles
The Best DJ Courses Online – Increase your technical skills and learn more about DJ promotion.
The Best DJing Books Every DJ Should Read – Geek up on DJ techniques & history.
The Best Beginner DJ Controllers – Start your mixing journey with a beginner-friendly DJ controller.
How to Make and Sell Merch – Boost your DJ brand & income.
How to get DJ Gigs – Follow these tips to get more DJ gigs.
The Best Music Marketing Books – Get your DJ marketing on point and get more DJ gigs.
13 Strategies for Better Music Marketing – Apply these strategies to grow your DJ brand.


se pueden crear puntos cue en ableton y si es así como puedo crearlos
You can use duplicate tracks and adjust their starting point – not as fluid as Rekordbox – but it’s a work around.
This video is still relevant:
“Ableton For DJs – Setting Up Cue Points”
https://www.youtube.com/watch?v=CRivC6mAZG8
sabéis de algún libro o video de como crear un dj set en ableton
Not specifically, I’m sure you’ll find something on YouTube that can help you.